
The first character I worked on was Fizzgig. What appears to be a simple creature turned into a very complex challenge.
I used foam latex for the tongue and uvula (the dangly thing at the back of the throat). I sculpted these in non-hardening clay. A negative form was made from each, and another form to close the mold. I poured foam latex in the mold and baked it until cured. The process took several hours. (All foam latex work should be done in well ventilated house! I used several fans to draw fresh air in, and the smell out.)
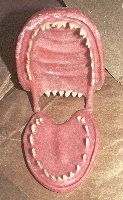
For Fizzgig's mouth, I purchased two dental kits, one flesh toned (for the gums and palate of the creature) and one tooth colored, along with a catalyst. (Note: using acrylics and/or plastics with a curing agent requires a well ventilated area! I did this outside.)
I created a model in non-hardening clay of the upper and lower plates including the teeth. I made a negative mold for each, cleaned it and prepared it for the casting. I filled in the teeth part of the mold first, waited until they were set but not yet hardened, and then introduced the flesh colored mixture.
I did this so that the upper and lower palates would come out in complete pieces, with the teeth embedded. Once hardened, I trimmed the edges, and repaired any defects. Next I attached the tongue, painted red using thinned acrylic paint so it wouldn't create a hard coating that might crack. The uvula was attached to the back of the upper palate.

I placed black fabric behind the palates, connecting the top and bottom. This stabilized the jaw and allowed the puppeteer's hand to work the mouth open and closed within the confines of the puppet without being seen.


Using open-cell foam sheets, I cut top and bottom patterns into petal shapes radiating from a point, and fitted together to resemble a melon sliced lengthwise. I affixed these to the upper and lower palate structures.
The bottom of the Fizzgig had to accommodate the legs and tail, and a hole for the puppeteer's hand. Any stress points were reinforced before the fur was applied.
The eyes were set, and then the fur was applied, starting with the face. I had to carefully trim it to give the impression of the nose bridge.
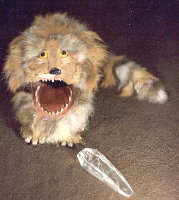
From a distance, it's convincing, and it did scare the daylights out of my cat the first time she saw it. However, it's much more heavy-handed than the somewhat smaller, more delicate rendition presented by the original.

I placed brown pads on the paws to disguise the seams and stitches. The pads on my Fizzgig are slightly larger proportionately than those on the original. I used dental tooth plastic to form the claws. They were built in a "T" shape and fit securely through a tiny hole in the tip of each digit.
The Fizzgig on display at the Craft and Folk Art Museum appeared to have no visible seams at all. (None! Anywhere!)
As you can see, mine has seams. Once completed, the fur hid the remaining leg seams.
I acquired several old pelts of different colors from thrift stores. Most were disintegrating rather badly on the skin side. (The average life of a fur piece, depending storage conditions, can be as little as 2 years.) I overcame that problem by taking scrap faux-suede and bonding it carefully to the skin side of pelt.
I would have preferred to use faux fur, had it been available in the length and colors that I needed, but it simply wasn't available.* In practical terms, faux fur is easier to care for (no fur falling out or allergies to deal with), it's easier to clean, to store, and less expensive than real animal fur. Happily, realistic faux fur is now available in all sorts of styles, colors, and fur lengths.

The pieces of fur were then glued to the form. I used the lay of the fur in all different directions (except for the face) to create a chaotic look to Fizzgig's fur.
I used black-pigmented acrylic for Fizzgig's nose. I had the eyes professionally made, as there was literally no place to purchase ready-made eyes with yellow irises. (Now, you can find any type of doll eye online, and some in intentionally strange colors and effects.)
The mouth opening suddenly is still enough to scare the daylights out of the unwary. (And, of course, as any pet owner knows, anything that hits the floor is fair game!)
* No animals were killed for this project. All pieces were recycled from thrift stores. The condition of the pelts rendered them unusable for garment trims.
Rather than see them tossed out with the garbage (an ignoble end!), I use them as a teaching aid to discourage the commercial use of fur for decorations, toys, or other "disposable" items.
Living things should NEVER be considered "disposable."
After 1984, the use of real furs has declined as technology has brought us many better-wearing faux furs which are easier to care for and less expensive than real ones. They don't decompose as real fur pieces do, and will last almost indefinitely if properly cared for.